

For most degrees, you need an obscene amount of classes (related or not to your major) in order to graduate. Universities make this achievement as confusing as possible, with uneven numbers that contribute to each credit course. To avoid wasting 5k on a class you don’t need to have to graduate, use the Excel College Credit Planner and lay out four years of your future easily.
How to use the Excel College Credit Planner
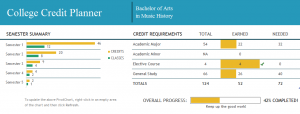
Using the link below, download the planner and open it in Excel. The first tab you are on is the “College Credit Planner” tab. Start by updating your major at the top blue bar. Next, move directly below it to enter in your “Credit Requirements”.
Fill in only the “Total” column for the Major, Minor (if needed), Elective, and General rows. The rest of the data in that area will fill in and update as you continue through the planner.
Next, skip down to the very bottom tab that reads, “Semester Summary Data”. Here is where you will enter your semester’s number of credits and the amount of classes you plan to complete. Once that is filled out, go back to the first tab.
Move to the “College Courses” section and begin entering each class you will be taking. In the “Degree Requirement” column, click the dropdown arrow and select what it applies to. This is also done in the “Semester” cells. Once all of your courses are listed and their information filled, go back to the top of the page.
The “Semester Summary” and “Credit Requirements” boxes will now be updated to reflect your planning and progress. From this point, all you need to do is enter in “Yes” on classes that are completed, and the rest of the information will update to show your progress.
Download the Excel College Credit Planner
Template courtesy of Microsoft
Check out this offer while you wait!