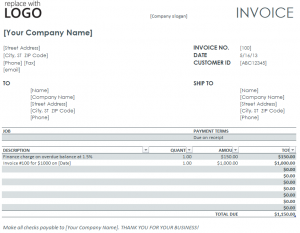
For small and medium businesses, it can be much easier to create and fill your own invoice charges rather than paying a third party to do it for you. A cheaper and more efficient option is the Excel Invoice Charge Sheet. Issue and track charges for your business and consumers with a simple and effective template.
How to use the Excel Invoice Charge Sheet
Using the link below, download the Excel template and begin working on the one page sheet. The top right corner is where you will place your company logo, and then the center top portion is for your slogan, and finally on the next line to the left is the space for your company name.
Under your company name, fill in all your company’s location and contact information. To the right, enter the Invoice information including the number, date, and consumer ID. The columns below are reserved for the billing and shipping addresses of the consumer.
The below column is where the payment term is listed. The default is “Due on receipt” but you can change it to your desired data. Under “Description”, fill in all of the jobs done in a short description. Then, to the right, the quantity and amount of each job. The totals next to these columns and the “Total Due” at the bottom will fill in automatically for you. Finally, enter your company name at the bottom to indicate who the checks are payable to. You’re finished!
Tips on using Excel Invoice Charge Sheet
- Add the date checks are due by, and the percentage that is charged if the check is late down at the bottom. This will help if there is a payment dispute.
- Keep a digital and printed copy of the invoice in your files for at least two years. Ensure the consumer also has the most updated version available to them.
- Always fill in the template digitally so avoid messy handwriting, misunderstandings, and potential fraud.
Download the Excel Invoice Charge Sheet
Template courtesy of Microsoft
Check out this offer while you wait!

