

Creating ad group spreadsheets can be an easy way to save time editing your AdWords search ads and implementing change in bulk. Simply by entering your own information into the columns listed on this template, you can create your own Ad Group Upload Spreadsheet. However, you can learn great formatting methods and some helpful tips to make the process even easier. Read the list of instructions and tips below to get started.
Ad Group Upload Spreadsheet Guide
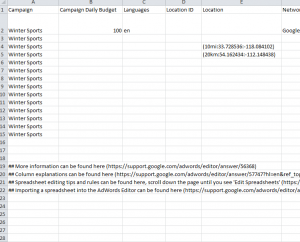
The goal of the Ad Group Upload Template and instructions is to familiarize you with the proper format so AdWords Editor can upload your document automatically. Start by listing your campaigns in the first column.
You will want to set a budget for the adjacent Campaign Daily Budget. In the example, you’ll notice the amount listed as “100”. This will specify that you have set your currency amount limit to 100 (dollars in this case).
You can set up the languages you want to use for your campaigns. The language set up for this campaign is for Standard English and the code “en” is used to indicate that in this languages column.
Column D will allow you to enter certain locations to target your campaigns. Simply enter the pre-made Location ID in this column. Lists of location ID tags are made on AdWords.
You can also select a specific location for your business by entering the exact coordinates in the Location column (E). The format required for this action is a longitude and latitude set like the one featured in the example Ad Group Upload Spreadsheet. This will target customers around the area you have chosen.
The Network column is intended for you to specify which search-related websites or apps you want your ads to appear. You can have your ads displayed in google search results and websites that have partnered with google simply by using the format featured in the example.
You can focus your ads more deeply by entering the specific ad group within your campaign you want to use. In the example using “Winter Sports” as the campaign, the ad group within that campaign is using “Snowboard Bindings” for a site that sells that item.
If you need to set a limit for your campaign, you can do so in the CPC bid column. Simply list the dollar amount you want to limit your campaign and you want pay more than that amount when someone clicks on your ad.
Next, the Flexible Reach column lets you specify certain items in your ad group as “Bid only”. You can make any category, from gender to age, a “Bid Only” item in your ad group.
Keywords are another important element for targeting your ideal demographic for ads. You’ve already selected your campaign and the ad groups within it, now simply enter the keywords associated with your specific product, service, or informational topic that will go with your ad.
You can also enter a category word into the Type column to help narrow your perfect demographic.
The Bid Adjustment section is where you can set new parameters for your bid on specific items. Let’s say you want to increase your bid spending by 50% on a certain day.
Now for the finishing touches. Enter a display URL to give your click sources a better sense of where they are being sent once they click your ad. You can use the main page of your website for example. This will go along with the Final URL column. This page is the landing site where your customers will be sent. If you want to send them to a specific product page on your site, the Final URL is where you will enter that information.
If targeting a certain platform is more your speed, you can specify what you want your sitelinks to target in the Platform Targeting column. You will see in the example that instead of one preference, the ad group is set to target “all”. The Device Preference column works essentially the same way, however you can use this column to make all your sitelinks either “mobile” or “all”.
Finally, the Ad Schedule column is where you can specify certain times for your ads to be published or give preference to them in general. In the example given, the schedule is set to bid 150% more at that time than your daily budget.
When your Ad Group Upload Spreadsheet is complete, you can simply upload this document to AdWords by doing the following:
- Click on Bulk Operations in your AdWords account.
- Choose Bulk Uploads.
- Click on the “Choose File” option.
- Choose the Upload and Preview” option to check for formatting errors
- Finally, click “Apply Changes” when everything looks good to go.
Download: Ad Group Upload Spreadsheet
Check out this offer while you wait!