

Flowchart templates allow a business owner to plan graphically and systematically a desired outcome. Flowcharts are especially as they can help ensure goals are successfully reached while also allowing for contingency issues and last minute delays. To create a flowchart for your business, try using a free flowchart template.
Tips for Using Excel’s Free Flowchart Template
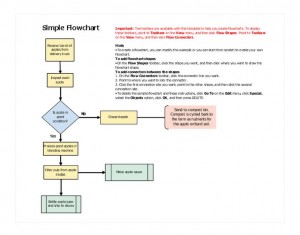
Here at MyExcelTemplates.com, our free flowchart template is completely free. Unlike other flowchart templates, ours is completely free to download and completely customizable. Once you have downloaded the flowchart template, it will automatically save to your Excel program under templates. The template allows users to build their own flow chart using the template given without having to create their own.
- Set page margins. To set your page margins simply click the “Page Layout Tab” in Excel and make sure the margins, page orientation and size are the same for both Word and Excel. For example: Word documents are usually left justified, to make sure your template is left justified, under the “Page Layout Tab” click on orientation and change the settings to left justified if needed. You can follow the same process for setting the page size, which is usually 8.5 x 11 for regular documents.
- Change the text and shapes to fit your business. The text and shapes given in the flowchart template are purely examples. To change the text, simply double click the text and write over it with whatever labels and instructions you wish to insert. To change the shapes, remove the given shape by right clicking on the shape and choosing “delete tab”. Next, click the “Insert Tab” and click on the “Shapes” menu. From this menu, choose your shape and double click the shape to add it to the template.
- Connecting the shapes and adding text. To add text to your shape, all you need to do is click on the shape and start typing. The same holds true to edit text within a shape; simply click the center of the shape and edit whatever text you need too. To connect the shapes, choose your connecting lines in the shapes gallery. Then, move your mouse over the first shape and red dots will appear to help you select your connection point. Now, hold the left mouse button while dragging the line to the next shape; once over the next shape the same red dots will appear and allow you to connect the shapes wherever you chose. Follow this step for as many lines as you wish to connect and your flowchart will be finished.
Download: Flowchart Template
Check out this offer while you wait!