

Learn how to append text in Excel with ease. When you append text in Excel, you are taking already entered information and creating new entries by adding onto it. Using a simple code entered into your Excel sheet, you can easily create rows of new information that draw from your previous information. This is especially handy when you are working with large amounts of data.
Download the example spreadsheet to learn how to append text.
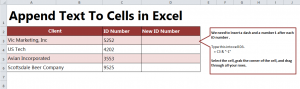
Download and open the example worksheet. You’ll see four clients listed with their ID numbers. The goal in this practice is to create a new ID number for each client just by using their current ID number. This will give you a new row of information.
Steps to appending text to cells:
- Chose the cell you want to create new content within. In the example, it is cell D3, so select that.
- In the chosen cell, start the code with the equal sign – “=”, then enter the cell number it will take from. Here, it is cell C3, which holds the current ID number you want append to.
- Finish the D3 entry with “&” proceeded by “-1”. The -1 is the appended text, that will be added to the previous ID number.
- The full formula here reads: = C3 & “-1”. Once entered, your new extra in D3 should read “5252-1”.
- Drag the D3 cell through the rows you want the entered code applied to, and it will append the text in these cells for you.
When is it best to use appended text formulas?
- When you need to create a lot of new information and don’t want or don’t have time to manually enter each cell.
- When you pre-existing information only needs a slight alteration in a new row.
- When updating the status of a client/student/etc without deleting or altering their existing information.
Tip for Future Success: Use this practice spreadsheet to try out different codes to change the appended text. Most easily, changing the “-1” in the example to “On Hold” or “-2a7c” will show you how this new appended text can look.
Want to learn more Excel tips and tricks? Visit our Guides.
Check out this offer while you wait!