


Macros allow you to automate tasks in Excel. In our example, we will show you how to combine values from two columns into a third column. We will use first names and last names as data.
Download the Example to follow along.
To enable the use of Macros in Excel, start by using the Developer toolbar. The Developer Toolbar is not visible by default so follow these instructions to find it.
First right-click anywhere in the top Ribbon then choose “Customize the Ribbon.”

In the dialog box, check “Developer” in the list on the right and press OK.

The Developer tab will now be visible in the Ribbon. Click the Developer tab to continue with Macros.
In the “Controls” group on the Developer toolbar, click Insert, and select the first option (button).

Next, click anywhere in the grid under the table in the spreadsheet.
The next step is to name the Macro when the “Assign Macro” dialog appears. In the example, it is named Mybutton_click.
Press New and the Visual Basic code window will now popup.
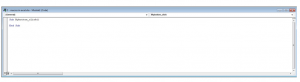
After “sub Mybutton_click()” press enter, and enter the following.
x = 2
Do While Cells(x, 1).Value <> “”
Cells(x, 3).Value = Cells(x, 1).Value + ” ” + Cells(x, 2).Value
x = x + 1
Loop
This code will loop through each row, getting data from the first and second columns, combining it into the third column to create a full name.
Press the Play button in the Visual Basic Editor and watch the results fill in the table. You’re finished!

Check out this offer while you wait!