

Learn to insert a column in Excel easily, no formula required. This valuable skill can be used to add a column, a row, or just a cell to any Excel spreadsheet, and will save loads of time if you’re managing an ever-changing Excel worksheet. Read on and download our example to see how this can all be done.
Download the Insert a Column or Row guide and follow along.
How to Add a Column or Row to Excel
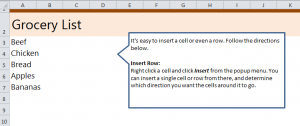
Start by downloading the example and you’ll see five entries for groceries. Your goal is to add a row that will be between one of those items.
Next, right click any row number from 3 to 7. Then scroll down and choose “insert”. This will create an empty row.
To choose if the row goes above or below, click the small drop down that has appeared and choose “Above” or “Below”.
Once you’ve finished this, you now have a clean, empty row and all the other rows have not been affected. You’re done!
Tips:
- There are no limits to how many rows or columns you can insert into an existing spreadsheet. So large files can always be updated without any mess-ups.
- Avoid deleting rows to add room for new information. Inserting a new row will work just fine.
- If you do have any formulas contained within the spreadsheet, make sure that you adjust the formula to reference the correct cells.
Want to learn more about Excel? Check out our guides section for tutorials, examples, downloads, and walk-throughs.
Check out this offer while you wait!