

Learn how to prevent duplicate entries in Excel by using a simple tool within the Excel program. You can use this feature to have the program search through massive amounts of information and eliminate duplicate entries that may mess up or alter your reports or tracking. Use our guide to implement an alert system that will tell you as soon as a duplicate entry is entered into your Excel sheet.
Steps to Preventing Duplicate Entries
Begin by downloading the example. This will help to guide you through each step needed to make an error message work.
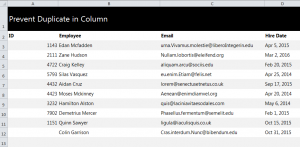
Once the spreadsheet is open, view Column A and rows A3 through A12. Select these as it is where you will be looking to prevent duplicates.
At the top of the Excel ribbon is the tab “Data”. Click this and then click the “Data Validation” option, then select “Data Validation” from that drop down.
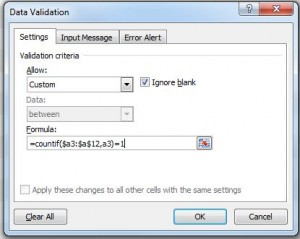
From here, you’ll automatically be in the “Settings” tab in the box that popped up. Enter the following:
Allow: Custom
Formula: countif($a$3,$a$12, a3)=1
Here is the visual for how it will look when done correctly:
In that same pop-up, move to the “Error Alert” tab and select it. In this tab, you’ll do the following to complete your error message:
- Make sure “Show error alert after invalid data is entered” is checked
- Choose Style: Stop
- Title: Duplicate Value
- Error Message: This value has already been entered in this sheet (or whatever error message you prefer).
After you’ve completed this, click OK. Now, go to cell A12 and enter “1151”. If your error message appears, it means you have done everything right.
Tips for Success: If you’re making error messages for multiple columns, customize each Error Message to indicate what column has the error. This will help when you’re uploading large amounts into the spreadsheet.
Check out this offer while you wait!